Recently a client approached us to build an IOT application that should communicate with remote devices over BLE. We built similar applications in the past with Xamarin; however, we found ourselves quite frustrated with the framework. We decided to take a step back and figure out exactly what we did and did not like about Xamarin and what we would like to change for this project. After quite a bit of research and a prototype project, we decided to go with Flutter. There are many articles about the pros and cons of Flutter, so we’ll spare the details here, but we chose it because of its cross-platform support, rapid dev cycle, and ease to call into native code when needed.
One requirement for this application was to authenticate users with Auth0. We searched pub.dev for an Auth0 library but ultimately came up empty handed. Undeterred, we rolled up our sleeves, pulled in the native Auth0 libraries, and used Flutter’s method channels to communicate with them.
In this study we’ll show you how to add the Kotlin and Swift Auth0 libraries to their respective platform projects and how to use Flutter’s method channels to talk to them and get back the Auth0 JWT.
First things first
To use Auth0 you will need a Domain and ClientId. You can get these by creating an Auth0 account and creating an application. You will also need to configure the callback URL. This URL is where Auth0 redirects the user with their authenticated token. Refer to Auth0’s documentation to configure these items.
Adding the Auth0 iOS library
We are going to use the native Auth0 Swift library to do the heavy lifting of interacting with the Auth0 web client. The library takes care of opening the in-app browser, authenticating the user, and returning the authentication token back to us. To add the library, add the following line to the Podfile (not the Podfile.lock file) at the root of the ios directory.
![]()
This should go in the target ‘Runner’ block in the Podfile. There should be a comment in there giving you a hint on where to place it.
Configuring the iOS project
You will need to add an Auth0.plist file to the iOS project and add the Client Id and Domain that you got from Auth0 to it. In ios/Runner create a file named Auth0.plist and add
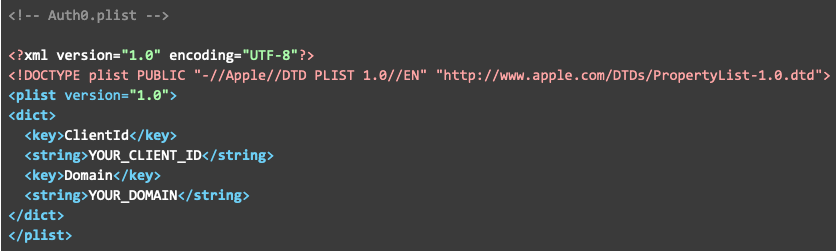
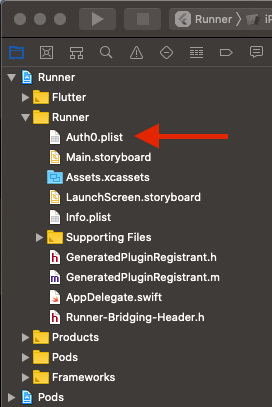
Be sure to change YOUR_CLIENT_ID and YOUR_DOMAIN to the values from your Auth0 account application. If you did not create this file from XCode you will need to add it to the project. To do this, open the file Runner.xcworkspace in XCode, expand the Runner project, right click the Runner folder, click Add File to “Runner”, and select the Auth0.plist file.
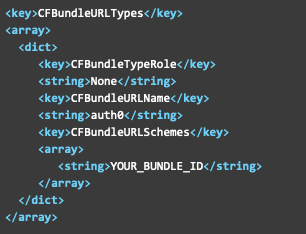
Next you will have to register the callback URL with iOS. Open the Info.plist file that is in the same directory as the Auth0.plist file. In this case it is easier to edit the Info.plist file from a text editor rather than from XCode. Be sure to replace YOUR_BUNDLE_ID with your app’s bundle Id.
Adding the code
We will have to create a Flutter method channel so the Dart code can communicate with the native library. In the AppDelegate.swift file import the Auth0 library with
![]()
Then add the following to the application() method and make sure to change YOUR_BUNDLE_ID.
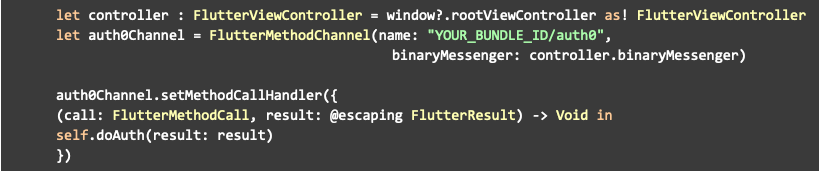
In the same class, create the doAuth method and set your audience
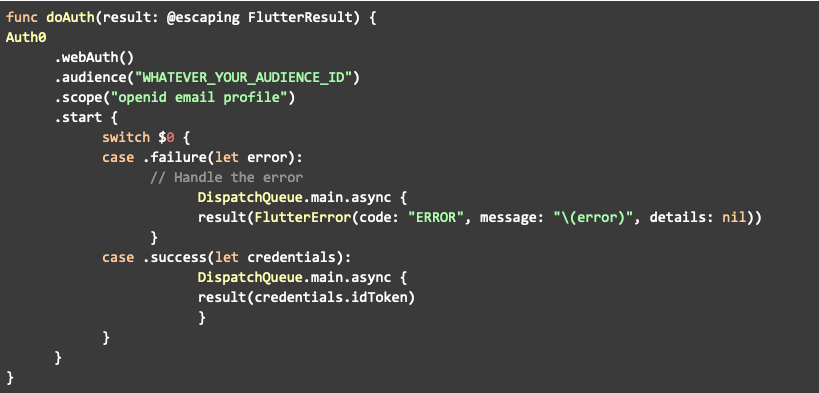
Add one more method to the AppDelegate class for Auth0

Adding the Auth0 Android library
To get Auth0 added to the Android project you will have to add a dependency to the /android/app/build.gradle file

And be sure to enable internet permission in the manifest file. This goes directly in the manifest block.
![]()
To add the client id and domain from Auth0 to the project, open or create a file name strings.xml in /android/app/src/main/res/values/string.xml and add in

Going back to the build.gradle file, add the following to the defaultConfig block and make sure to set YOUR_PACKAGE_ID

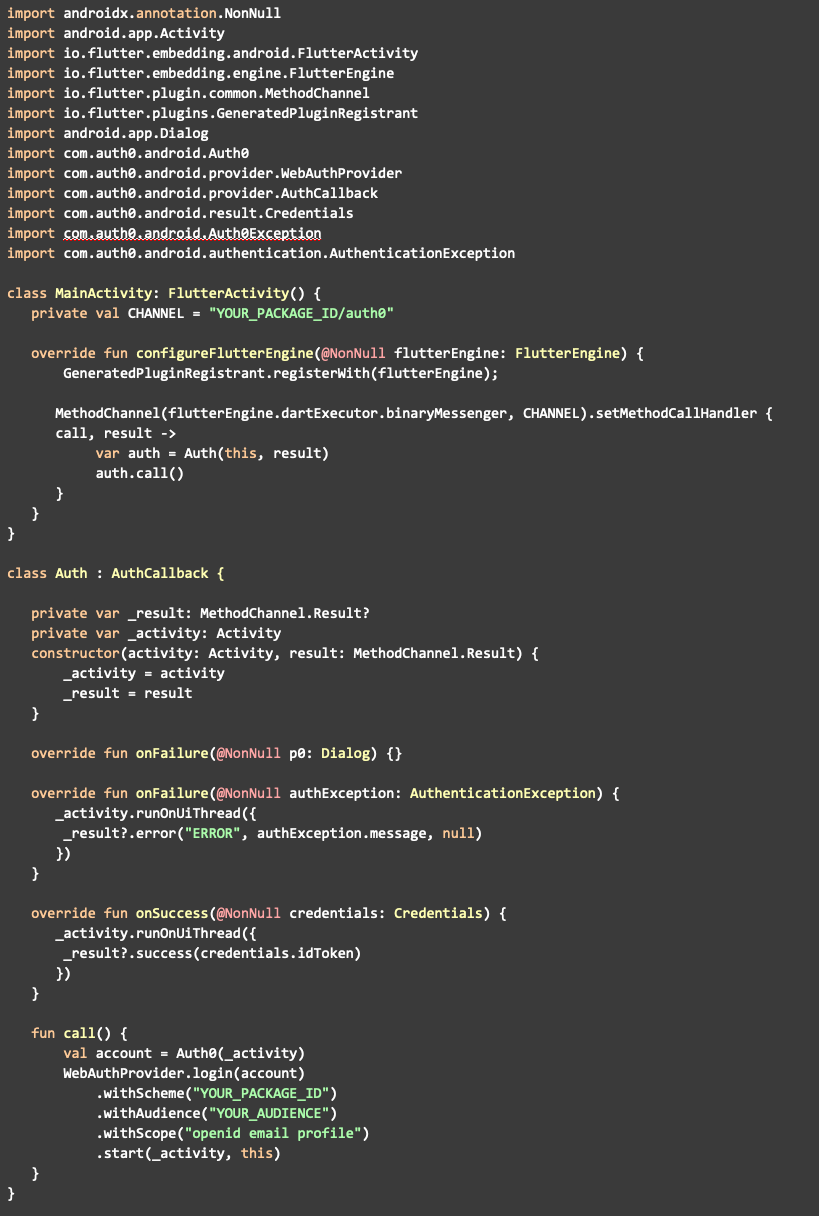
Now we have to create the Android Auth0 method channel. Add the following to the MainActivity in /android/app/src/main/kotlin/com and, again, be sure to update YOUR_PACKAGE_ID
Initiate Auth0 from Dart
And now for the magic. To call the platform code from Dart, we need to create a MethodChannel and pass it a path to our platform method. This is usually the bundle/package id followed by the method to call.
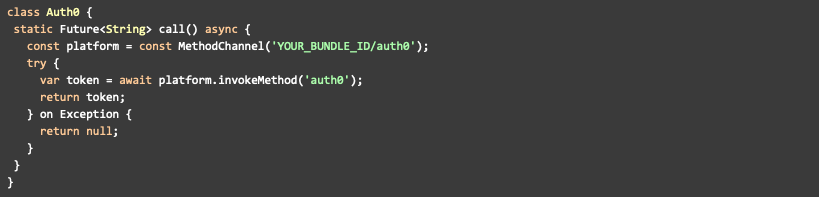
We catch all exceptions because the library will throw an exception if the user cancels out of the process. To keep the code concise, we simply return null. Be sure to handle your exceptions appropriately.
After calling this method, a web browser should open at your Auth0 authentication page and a user should be able to sign up/log in. After they are authenticated it should auto redirect them back to the app and you should have access to the authentication token generated by Auth0.
Conclusion
In this study, we demonstrated how to integrate the native Auth0 libraries into a Flutter application. We used Flutter’s method channels to call into the Auth0 library to open an in-app browser to authenticate users. With the method channels we passed the authentication token back to Dart to be consumed by the application. At some point we plan to create a package to ease this process, but for now we hope you found this useful.